In a highly dynamic environment workforce that involves messaging systems to be fast and operate smoothly, well-known messaging systems like Apache Kafka mustn’t encounter the problem with scaling. Because of large messages coming in and the consumers unable to scale, the messages could get stuck and disrupt the flow. While many solutions address this problem, we have devised a solution where we scale our EKS pods (consumers) to consume messages and prevent the messages from getting held up in the Topic based on the message count.
We use Amazon’s MSK, a managed service for Apache Kafka, and we use EKS for consumers.
1. Log into the AWS account and choose Create Cluster.

2. Give Cluster name, for example, MKS-EKS cluster.
3. In the Cluster type, choose provisioned since we will be providing the number of brokers we want to run. And Apache Kafka version will be 2.6.2.

4. Next, we will configure the Brokers settings. (Our current settings)
- Broker type: kafka.t3.small
- Number of zones: 3
- Number of brokers per zone: 3
- Brokers per zone: 2
So, the total number of brokers is 6.

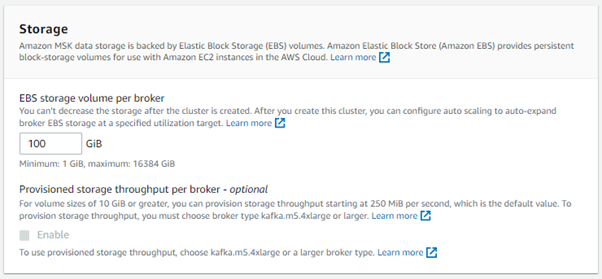
5. For Storage, our EBS storage volume per broker is 100GiB and Provisioned storage throughput per broker is not enabled.
6. For Configuration, we leave the MSK default configuration the same.
7. Click Next and we land on the network settings of the cluster. Here we specify the VPC, zones, and subnets where your brokers are deployed. Our current configuration has:
- 3 zones, each zone has one subnet.
- The public access is off, which means the brokers will only be accessible from inside the cluster’s VPC.
- Specify the Security Group you want to use.
8. On the Next page, Security settings:
- Under Access control methods, leave everything as Default.
- Under Encryption, leave everything as default except Plaintext, which should be Enabled.
- To Encrypt data at rest, choose the encryption to your liking. We are making use of the AWS managed key.

9. On the Next page, Monitoring and tags, under Monitoring, leave everything default, and under Broker log delivery, choose the option according to your preference, we’ve chosen, Amazon CloudWatch Logs.
Under tags, mention the tag key and value.
10. Review and hit Create Cluster to create the MSK cluster.
Creating your first Kafka Topic:
The first things to take care of here are to create a client machine and appropriate security groups. After you have created the client machine, we move on to install java and Apache Kafka on this machine.
First, install java:
- Install Java using:
sudo yum install java-1.8.0
- Download Apache Kafka:
wget https://archive.apache.org/dist/kafka/2.6.2/kafka_2.12-2.6.2.tgz
- Move into the directory where Apache Kafka was downloaded and unzip using this command:
tar -xzf kafka_2.12-2.6.2.tgz
- Go inside the 12-2.6.2 directory.
- After the MSK cluster you created earlier is Active, then go to the cluster and click on the View client information.

6. Copy the private endpoint for plaintext authentication and the Apache ZooKeeper connection string (also for plaintext communication). Also, not down the BootstrapBrokerString.
7. The below command creates a Topic names MSK-EKS topic replace the ZookeeperConnectString with the connection string taken in the previous step `:
bin/kafka-topics.sh –create –zookeeper < ZookeeperConnectString > –replication-factor 3 –partitions 1 –topic MSK-EKS
8. To produce and consume message to this topic, follow:
a. Go to the bin folder inside the 12-2.6.2, and create a text file named
client.properties and paste this inside it:
security.protocol=PLAINTEXT
b. Run the following command and replace BootstrapBrokerString with the string you obtained in step 6:
./kafka-console-producer.sh –broker-list BootstrapBrokerString –producer.config client.properties –topic MSK-EKS
This command makes use of the kafka-console-producer.sh shell script to produce some messages. As soon as you press Enter, you get a prompt to type in your messages.
Note: In this POC, we have our own producer, containerised it, and used it to produce messages inside a server which reduces the hassle of producing messages manually. Same goes with consumer.
c. Run the following command and replace BootstrapBrokerStringTlswith the string you obtained in step 6, only this time, with kafka-console-consumer.sh:
./kafka-console-consumer.sh –bootstrap-server BootstrapBrokerStringTls–consumer.config client.properties –topic MSK-EKS –from-beginning
This will start showing you messages that had been sent previously. Note that there is a –from-beginning option that helps in reading messages that were sent(produced) by the producer and not read (consumed) by the consumer in real time.
9. Consumer Groups:
- Consumer groups in Kafka are mainly used to add multiple consumers to group and manage the messages consumed easily. Here, we make use of consumer groups similarly, but we will have one consumer group for the time being.
- Here we make use of kafka-consumer-groups.sh, which will make use of the shell script to consume messages among a consumer group. Here, particular to MSK, we make use of the name- msk.canary.group.broker-6. You can change the number at the end to explore different groups as per the application configuration.
Create an EKS Cluster
- When you open the EKS page on your AWS Management console, the first page will ask you for Cluster configuration, here we give the name to our cluster (cannot be changed), Kubernetes version, and Cluster service role (allowing Kubernetes control plane to manage AWS resources on your behalf). Once done, leave everything else default. Click, Next
- On the next page, you will find the Networking Here we specify networking specifications like VPC, Subnets, Security Groups.In the Cluster endpoint access settings, choose Public and leave everything as default on Networking add-ons. Click Next.
- On the Configure logging, leave everything as default. Click Next.
- Review, and hit create.
Lambda Function Details
- VPC Details regarding the Lambda function:
The Lambda function sits under private subnets. Three private subnets and corresponding routes have been given in route tables, and a NAT Gateway is also configured associated with the public subnet.
Security Groups details:
a. There are 2 security groups for the Lambda function:

As you can see, one of the rules accepts all traffic from a separate SG. An SSH rule is also added for IP to make changes and configure, which is used by a separate service here.
b. MSK-EKS-SG Security Group connects to the MSK server to fetch the message count in the current consumer group of the Kafka topic.
c. EKS-Conn-Lambda Security Group will contain the connectivity details to the EKS cluster to scale the consumer pods based on the message count from the Kafka topic.
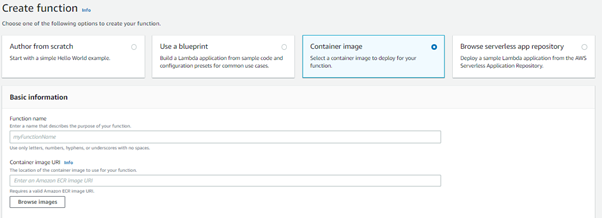
The Lambda function here is launched from a container image from ECR (Elastic Container Registry):
What’s in the image?
The Lambda function is launched from ECR and is written in Python. This python code contains code to connect to Amazon MSK and connect to Amazon MSK to count the messages in the topic. As it is a known fact that Amazon MSK is a Managed Kafka service, as explained earlier, it is a hassle if any of the messages don’t get passed on and get stuck inside the topic. This python code will help in resolving the issue.
The Lambda function is set to be triggered every 4 hours (can be changed) by CloudWatch events. Every time the Lambda function is triggered, it checks for LAG in the Topic for the Consumer group (number of messages inside the Topic for that Consumer Group). If the given message count is more than the value mentioned in the environment variable of the lambda function, it scales up the consumer pods in the EKS cluster. If the message count is less, it will scale down. Thus, it helps in the smooth operation of message consumption.
Written by – Karanam Sreenivas and Sameerahmed BalaganurPost navigation