Table of Contents
- Overview: Velero
- Architecture:
- Usecases:
- How Velero works:
Overview: Velero
Velero is an open-source tool for safely backing up and restoring resources in a Kubernetes cluster, performing disaster recovery, and migrating resources and persistent volumes to another Kubernetes cluster.
Velero offers critical data protection features, such as scheduled backups, retention schedules, and pre or post-backup hooks for custom actions. Velero can help protect data stored in persistent volumes, making your entire Kubernetes cluster more resilient.
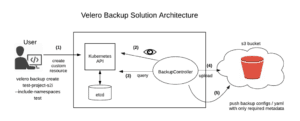
Architecture:
Usecases:
- Back up your cluster and restore it in case of loss.
- Recover from disaster.
- Copy cluster resources to other clusters.
- Replicate your production environment to create development and testing environments.
- Take a snapshot of your application’s state before upgrading a cluster.
How Velero works:
Each Velero operation–on-demand backup, scheduled backup, restoration–is a custom resource defined with a Kubernetes custom resource definition, or CRD, stored in, etc. Velero includes controllers that process the CRDs to back up and restore resources. You can back up or restore all objects in your cluster or filter objects by type, namespace, or label.
Data protection is a chief concern for application owners who want to ensure they can restore a cluster to a known good state, recover from a crashed cluster, or migrate to a new environment. Velero provides those capabilities.
Procedure for Backup and Restore of Kubernetes cluster in AWS:
Step 1: Create an S3 bucket and set the following permissions
- Create a bucket with custom name.
- Go to Permissions section in S3 and attach the below given bucket policy.
{

\"Id\":\"Policy1612005814976\",

\"Version\":\"2012-10-17\",

\"Statement\":[

{

\"Sid\":\"Stmt1612005810869\",

\"Action\":[

\"s3:AbortMultipartUpload\",

\"s3:DeleteObject\",

\"s3:GetObject\",

\"s3:ListBucketMultipartUploads\",

\"s3:PutObject\"

],

\"Effect\":\"Allow\",

\"Resource\":[

\"arn:aws:s3:::<BUCKET>\",

\"arn:aws:s3:::<BUCKET>/*\"

],

\"Principal\":{

\"AWS\":[

\"arn:aws:iam::<xxxxxxxxx>:user/<xxxx>\"

]

}

}

]

}
Step 2: Download & Install Velero
mkdir velero

cd velero
wget https://github.com/vmware-tanzu/velero/releases/download/v1.5.3/velero-v1.5.3-linux-amd64.tar.gz
tar xzvf velero-v1.5.3-linux-amd64.tar.gz

cd velero-v1.5.3-linux-amd64

sudo cp -r velero-v1.5.3-linux-amd64/velero /usr/local/bin/
Step 3: Setup Velero credentials
Create a credentials file with name “credentials-velero”. (You can give any name of your choice)
vi credentials-velero
[default]
aws_access_key_id = <aws_access_key_id> aws_secret_access_key = <aws_secret_access_key>
aws_access_key_id = <aws_access_key_id> aws_secret_access_key = <aws_secret_access_key>
Step 4: Install Velero
velero install \\

--provider aws \\

--plugins velero/velero-plugin-for-aws:v1.1.0 \\

--bucket <BUCKET> \\

--backup-location-config region=ca-central-1 \\

--use-volume-snapshots=false \\

--secret-file ./credentials-velero \\

--use-restic
Step 5: Taking backup
We can backup entire cluster or backup a specific name space or objects like pod, deployment, etc using Velero backup command.Here for the demo we are going to back up a name space in k8’s cluster.
Step 1: To list all the name spaces created in the cluster type the following command.
kubectl get ns
The above command will list out all the name spaces so that you can choose the once you want to backup
Step 2: Create a backup for a name space in Kubernetes
velero backup create firstbackup --include-namespace test-name-space
This will create a backup in the s3 bucket.
Step 3 : To get the list of backup files type the following command
velero backup get
Step 4: To get the detailed view of backup use the following command
velero backup describe firstbackup
Step 6: Restoring the Backup
Now that we have created our backup. We shall now delete the name space “test-name-space” and restore it from s3 using velero
Step 1: To delete the name space
kubectl delete ns test-name-space
Wait for the name space to be deleted
Step 2: Then restore the namespace from the backup we have just crated
velero restore create --from-backup firstbackup
Now let the restoration to be completed.
Step 3: After success restoration we can now check the name space which we deleted
kubectl get ns
This will list all namespaces in Kubernetes including our deleted one
By following the above-mentioned steps, we can create a smooth Backup and Restore of kubernetes cluster to AWS.
Anusha Ravindra – DevOps Trainee
Sai Krishna Sirigiri – DevOps Engineer
Want to know? Contact us now for a free consultation