Email is the most primitive form of person-to-person communication in the post-internet era. It’s prevalent to receive attachments as part of an email. In most cases, these attachments are meant to be manually processed by users for personal or professional reasons.
In the current era of cloud computing, applications hosted in different environments can communicate through APIs or exchange data through queues. On-premise and Cloud systems can also be connected through a site-to-site VPN or a private dedicated connection like AWS Direct Connect.
However, even in today’s era of cloud computing, there are situations or scenarios where data is sent from legacy systems (on-premise) or legacy applications through email with attachments so that individuals can manually download these attachments and upload them to any cloud service. These attachments could contain important information needing further extraction, processing, and analysis (ETL). Below are a few such reasons or scenarios:
- Unavailability or lack of possibility to create a VPN or dedicated private connection between on-premise and cloud systems (Due to technical or organizational reasons).
- Lack of possibility to create API or queue-based communication with legacy CRM / HR / Finance systems.
The core purpose of this article is to provide a way to extract email attachments using AWS Services. The article also provides options for creating flexible AWS pipelines to process email attachments. There are multiple steps involved in extracting email attachments using AWS Services, and these are detailed below:
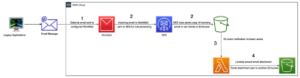
Illustration to extract email attachments using AWS
- Configure a dedicated email server using Amazon WorkMail.
- Configure Amazon SES (Simple Email Service) to send a copy of the incoming email in raw format to a bucket in Amazon S3 (Simple Storage Service).
- Create AWS Lambda function in Python to extract email attachments from raw email messages.
- Configure S3 event notifications to invoke AWS Lambda on the put event (when the email in raw format is added to S3) to post the email attachment to another S3 bucket.
# 1 — Configure a dedicated email server using Amazon WorkMail
The first obvious question is — Why not use a more popular email server like Outlook? Why use Amazon WorkMail?
There are readily available automation workflow tools such as Microsoft Flow or Zapier. For example, Zapier has readymade automation to extract email attachments and directly send them to AWS S3. The major problem with this approach (apart from the need to use a premium subscription) is that it is mandatory to input AWS Access Key ID and AWS Secret Access Key. This poses a security risk in sharing keys to an external service and might not be comfortable for many.
The solution is to create a dedicated email hosting using Amazon WorkMail. This means a dedicated and secured email host can be created where legacy applications or systems can send emails with attachments for further processing. Given that email is coming into the AWS ecosystem, it becomes fundamentally easy to integrate with other Amazon services, such as S3.
Steps to create a dedicated email server using Amazon WorkMail
- Log into the AWS console and navigate to the service — Amazon WorkMail.
- Select the option to create an organization. Amazon WorkMail organization gives email access to a group of users in your company. Their new email addresses are created based on the domains you select for your organization.
- Select an email domain for the new email server to associate the new email address, provide an alias and create an organization. There are options to select an email domain that includes an existing Route 53 domain, a new Route 53 domain, an external domain (like something hosted on godaddy.com), or a free test domain. In this specific case, select “free test domain” as the option for the email domain and enter “aws-automation” as an alias (See below for reference).

Create an Amazon WorkMail organization using a “free test domain”.
Steps to create dedicated email address to receive incoming emails from legacy systems or applications
- Navigate to Amazon WorkMail and select the newly created organization — ‘aws-automation.’
- Select the option to create a user. Follow the prompts and create a user called ‘emp-training-info.’ Given that the name of the organization that we previously entered is ‘aws-automation,’ and we are using a test email domain, the email address will be created as ‘demo@pnpl.awsapps.com’ (See below for reference).
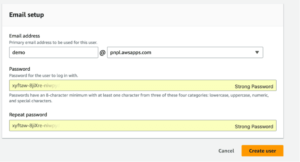
Configure a user against the new email domain.
If a different email domain was used while creating an organization, say — ‘myorganization.com’ (provided Route 53 entries are correctly configured), then email address in this case could be demo@myorganization.com
# 2 — Configure Amazon SES to send a copy of the incoming email in raw format to Amazon S3
Given that we have created an email server using Amazon WorkMail, the in-built AWS integration creates the following two records in Amazon SES:
- The test email domain → ‘aws-automation.aws-apps.com’ is automatically verified. A record can be found in Amazon SES — Domains.
An active rule set called ‘INBOUND_MAIL’ is automatically created. A record can be found by using the action ‘View Active Rule Set’ under Amazon SES — Rule Sets
Steps to create a new rule for the active rule set that copies email sent to a specific email address into a specific S3 bucket
- Select the ‘Create Rule’ option under Amazon SES — Rule Sets — View Active Rule Set.
- Add a recipient to personalize the rule. In this case, add the recipient as ‘demo@pnpl.awsapps.com’
- Add an action for ‘S3’ by choosing a destination S3 bucket to which the raw email message format should be copied.
- Select an existing S3 bucket or create a bucket from the dropdown option. In this specific case, create an S3 bucket ‘legacy-applications-email.’ Bucket names are globally unique, so choose a bucket name of your choice. Optionally select an object key prefix. Else continue to the next step.
- Provide a rule name (say — put-email-copy-legacy-applications-email-bucket) and create the rule.

SES Rule to redirect a copy of incoming email (raw) for a specific recipient to S3 bucket
A copy of the incoming email sent to the configured email address (demo@pnpl.awsapps.com) will be created in the configured S3 bucket (legacy-applications-email). However, the message was copied in a raw email message format that is not readable, and hence the email attachment cannot be extracted. A Python program using the Python email package can extract the email attachment from the raw email message. This is covered next.
# 3 — Create AWS Lambda function in Python to extract email attachment from raw email message
Below are the steps to create an AWS lambda function in Python to extract email attachment:
- Navigate to Lambda in AWS Console.
- Create a function by providing a function name, runtime, and default execution role. In this case, select the function name as ‘extract-email-attachment’ and runtime as ‘Python 3.8’. For the default execution role, select a pre-created role that includes permissions for Lambda and S3 (This can be created before this step via AWS IAM).
- Copy the code mentioned below. The code can also be found at https://github.com/manishjuneja/extract-email-attachment.git.
Python code to extract attachments from raw email messages and send to the destination S3 bucket
The above code performs the following steps:
- Extracts the bucket name and object key from the newly created raw email message against the S3 bucket ‘legacy-applications-email.’ This is the bucket to which incoming emails are sent via rules configured in Amazon SES.
- The attachment and the address on the raw email are extracted using the email package. (lines 24–28)
- The extracted attachment is temporarily stored as attach.csv and then uploaded to a destination bucket of choice with the file name ‘attach-upload-<timestamp>.csv’ (lines 36–40). In this case, the destination S3 bucket is selected as ‘extracted-email-attachments.’ The code on line 37 also creates a folder in this bucket using the address on the email. This way, attachments from different addresses can be grouped in separate folders.
# 4 — Configure S3 event notifications to invoke AWS Lambda (when email in raw format is added to S3) and extract the email attachment to another S3 bucket
For the bucket created in step # 2 (legacy-applications-email) that holds the raw email message copy, create a S3 event notification with event type as ‘Put’ and configure to invoke the lambda function created in step # 3 (extract-email-attachments)
![]()
S3 event notification to invoke AWS Lamda created in Step 3
The lambda function created in step # 3 uses a destination bucket where the extracted email attachment will be sent. In this specific case, the destination bucket is ‘extracted-email-attachments.’ This bucket should be created before creating the lambda function. It is also recommended to change the bucket name as it is globally unique.
This completes all the steps. To test, send an email to the configured email address with an attachment, which is demo@pnpl.awsapps.com. Once the email is sent, navigate to the S3 bucket and notice an object that starts with ‘attach-upload-*.csv.’ This object will be created with a folder prefix where the folder name is the same as the address extracted from the email (See below for reference).
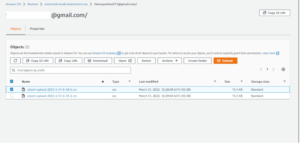
Email extracted and copied to destination S3 bucket grouped by from address.
This will be the same attachment sent as part of the email. Download and verify the contents to confirm. Given that the file’s contents are now available in AWS, the content can be further processed by creating a custom data pipeline that could be used for further analysis.
Architecting a data pipeline to process the extracted email attachment
Below is an illustration of a potential data pipeline architecture that can perform an ETL process on the extracted email attachment and make it available for further analysis. The assumption is that the original emails sent to Amazon WorkMail contain CSV files as attachments.
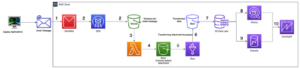
Potential Data Pipeline in AWS to Process Extracted Attachment
Below is a breakdown of the steps from 5 to 10:
- #5 — AWS Glue treats the S3 bucket (silver bucket)as its input, reads the CSV file, and converts it to parquet format. Optionally, AWS Lambda can be used instead of Glue. The selection between both depends on the volume and nature of the data.
- #6 — The transformed data is then put in another S3 bucket (gold bucket)
- #7 — The gold bucket will be part of the S3 Data Lake.
- #8, #9 — The S3 Data Lake can act as input to both Athena and RedShift.
- # 10 — The data from Athena and Redshift can be analyzed through AWS Quciksight.
This completes the article detailing the step-by-step process involved in extracting email attachments using AWS. A sample architecture is also provided to further process the extracted attachment through the ETL process using AWS Services.
Written by – Manish Juneja


