
What is AWS Workspace
Workspace is a VDI Solution offered by AWS wherein users can provision virtual desktops on the AWS cloud. It is a managed and secure desktop-as-a-service solution from AWS, and users can provide either Windows or Linux machines in minutes. Users can quickly scale up or scale down as per the requirement. AWS Workspace can help you to manage hardware inventory, operating system versions, updates, and patches. Organizations with employees working remotely from home can use AWS Workspace and deliver a desktop experience to their employees, ensuring the correct set of policies are there to protect their applications and data from misuse. Virtual desktops provisioned on AWS Workspace can be accessed on various devices like PC, Macs, iPad, Android tablets, etc.
AWS Active Directory Services
AWS has developed directory services to provide multiple ways to use Amazon Cloud Directory or Microsoft Active Directory for authentication purposes, along with other AWS services. If you are moving your AWS-dependent workloads, you will need access to AD Domain Controllers, also known as DCs. There are three primary services for Active Directory in AWS: – AWS Managed Microsoft AD, Simple AD, and AD Connector. Suppose you want to use AWS End User Computing Services like AWS Workspaces with your existing Active Directory Credentials. In that case, you should be able to connect AWS Workspaces with your AD Infrastructure. This can be achieved using AWS Managed Microsoft AD and AD connector solutions. AWS Managed Microsoft AD is a managed service that makes it easy for organizations to migrate their AD-dependent applications to the AWS cloud. Also, it takes away the pain of managing AD infrastructure. Being a managed service, AWS will do that work for you.
However, AWS AD Connector, on the other hand, is a proxy that enables you to connect AWS services like AWS Workspaces with your existing on-premises AD and use your current on-premises AD identities without actually deploying AD infrastructure on the AWS cloud. AWS Simple AD is a managed directory powered by Samba 4 AD compatible server and can be integrated with AWS workspaces for user authentication purposes.
Pre-Requisites:
- Basic to medium knowledge of AWS.
- Ensure you are in a region supporting Workspaces and Simple AD.
- This is a paid service so some cost will be incurred for this activity.
- There must be a VPC with a public subnet and two private subnets.
Step-by-Step Approach to Integrate Workspace with Simple AD
Step 1:
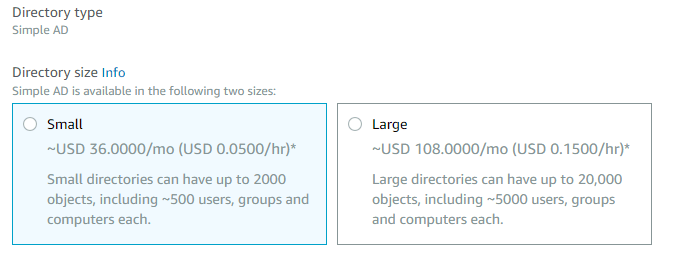
The first step will be to log in to your AWS console. Once you are in your AWS account, please check whether the region supports both AWS workspace and Simple AD. Go to AWS Workspaces and click on directories at the left panel on your screen. Click on Setup Directory and choose Simple AD in Directory Types. Simple AD is available in two sizes, Large and Small; please choose minor for the sake of this demo.
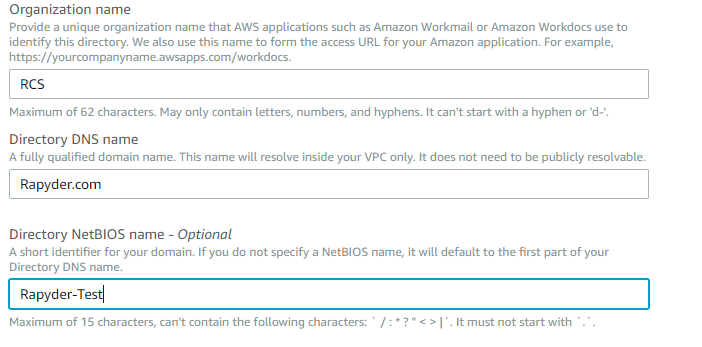
Enter your Organization Name and Directory DNS Name. Please ensure it is a Fully Qualified Domain Name (FQDN). Directory NetBIOS name is optional; you can provide this if you want a short identifier for your domain.
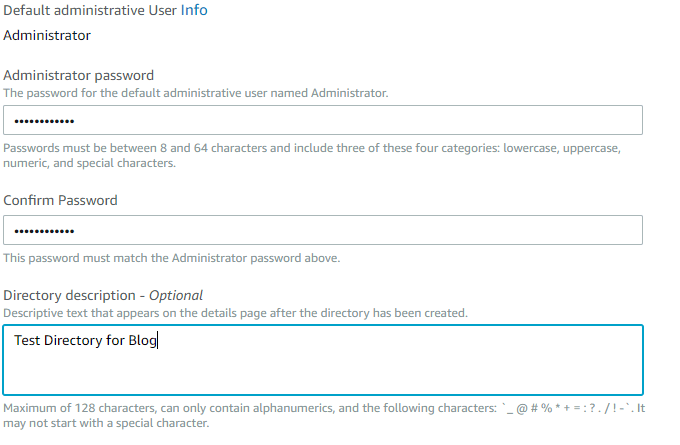
Enter Administrator details for the admin users.
Step 2:
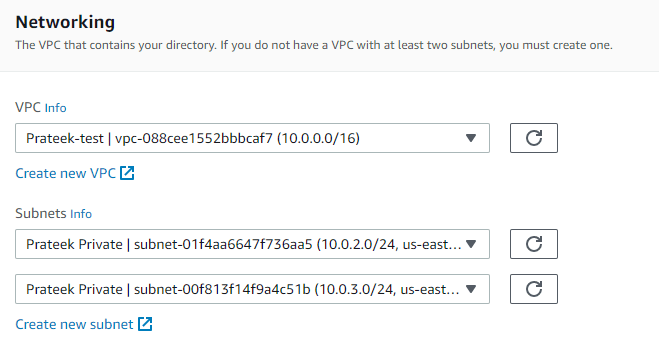
The next step is to choose VPC where you want this Workspace to be launched. Select a VPC and Two private Subnets from the drop-down. Click on Next and review all details and create the directory.
Step 3:
Once you have created a directory in Simple AD, go to the Workspaces tab and click Launch a Workspace. Select the manual that you have made and click on next. The next page will ask you to create users, so fill in the information of the users and click on Create users. You can create multiple users as well.

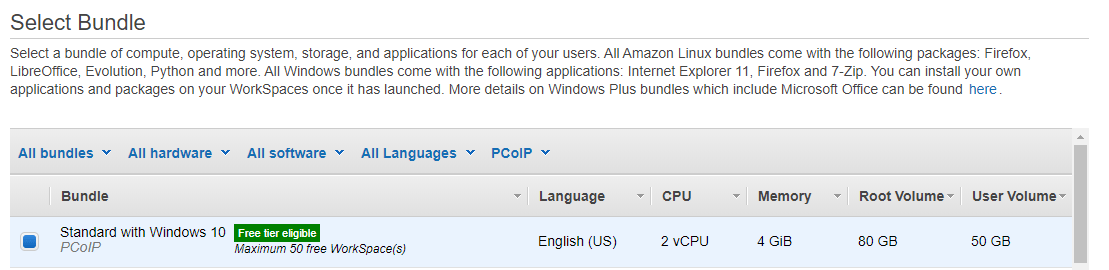
Step4:
The next step is to choose the Workspace Bundle. We will choose one with a free tier for this demo purpose.
Step 5:
The next step is configuring the Workspace to specify Running Mode. We will select Auto Stop as a cost-effective solution and not Encrypt the Volumes in this demo.

Step 6:
Once you have created Workspace and it is active, you will receive an email from AWS, and it will have an activation Link. Following the link, you can activate your Workspace and set up a password.
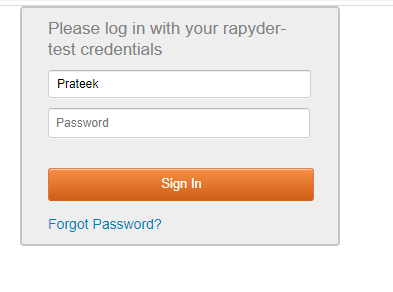
Once you have set up your account, you can download and launch the client or continue using Web Console. The final page for the Web console should look like this.